Building A Kubernetes Homelab with K3S and Raspberry Pi 4: The Hard Way
K3S is one of the best solutions available if you want to deploy your own Kubernetes cluster inside your homelab to play with, or just for learning purposes. And it is really easy to get started with a couple of (actually, you only need one) Raspberry PIs. But “What is K3S?”, you might ask. From their website ;
K3S - Lightweight Kubernetes

Lightweight Kubernetes. Easy to install, half the memory, all in a binary of less than 100 MB.

Great for:

Edge
IoT
CI
Development
ARM
Embedding K8s
Situations where a PhD in K8s clusterology is infeasible
Although there are other ways to run Kubernetes with limited resources, I found K3S is the most expandable, upstream-compatible, tweakable, and production-ready alternative for full-fletch Kubernetes clusters deployed with kubeadm or similar.
There are some fantastic tools available like k3up to get you started with your cluster fairly quickly, but in this article, I will focus on how to do things, the hard way, with lots of references for advanced reading material as well.
So, buckle up and get ready because we are starting!
K3S Basics
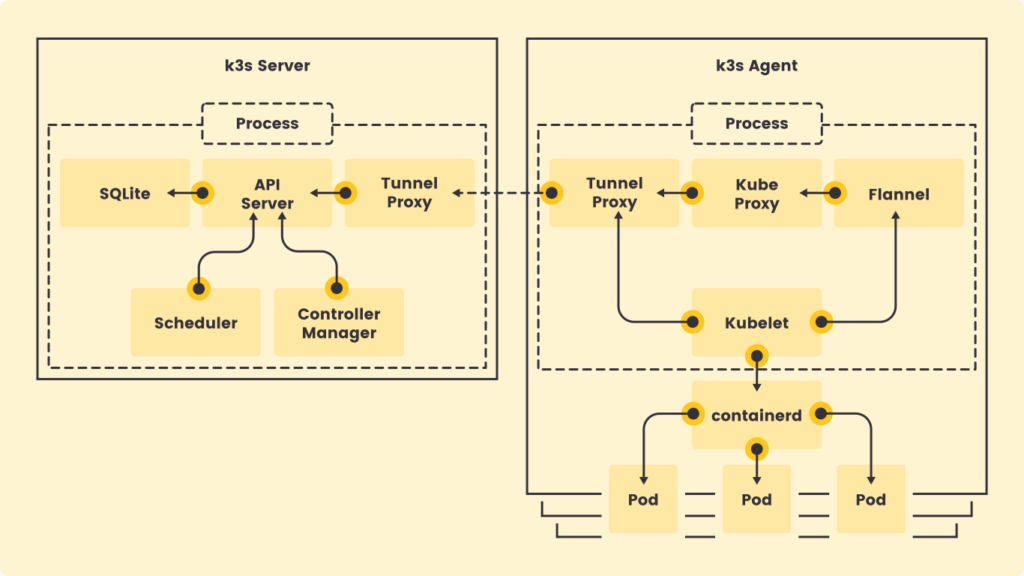
The main components of K3S are called K3S server node(s) and K3S agent node(s). K3S server node(s) is responsible for managing the cluster, running SQLite or etcd, hosting the API Server, and acting as a scheduler, as a regular Kubernetes master node. K3S Agent on the other hand is just like the regular Kubernetes worker nodes. You can find more information in the official K3S documantation .

You can have a single-node K3S server with an embedded SQLite database which will also act as an agent node, or, you can have a combination of server node(s) with one or more agent nodes to support different use-cases. K3S, by default, uses SQLite, Flannel, and Traefik Ingress Controller and comes with a local-path storage provisioner to handle stateful applications, therefore, it is a really good option to deploy on IoT devices, etc.
K3S can also be a great option for more advanced stuff as well because of its configurable nature. Only with some minor tweaks on default settings, we might end up with an almost production-ready Kubernetes environment, and in this article, we gonna do just that!
Honorable Mentions (Alternatives)
Design
Although that I am generally happy with the default settings of K3S and 32-bit Raspberry Pi OS, I decided to spice up things by making some interesting design choices.
- 64-bit Ubuntu 21.04 instead of 32-bit alternatives.
- 1 server (master+worker) + 2 agent (worker) nodes. I am planning to add 2 additional server nodes in the future to have an HA setup.
- Keepalived cluster between K3S nodes.
- Calico instead of Flannel (K3S default) as CNI.
- Nginx Ingress instead of Traefik (K3S default) Ingress.
- Etcd instead of SQLite (K3S default).
- A VM with Ubuntu 21.04 x86-64 as Rancher cluster manager to have a nice management UI (optional).
- MetalLB instead of servicelb (optional).
- Longhorn as local distrubuted block storage and NFS External Provisioner as CSI (optional).
- Automatic SSL certificate management and renewals with cert-manager (optional).
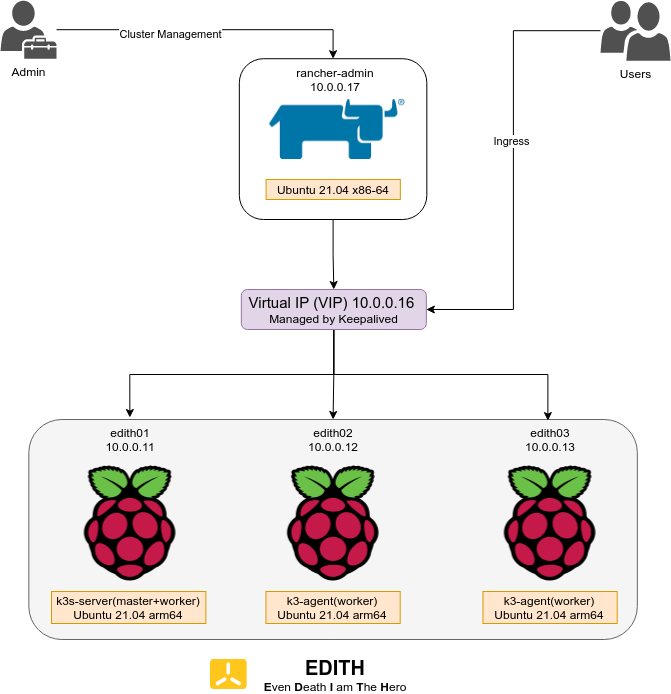
so the final design will look something like this;

Requirements
Rancher Cluster Manager (Optional)
VM with Ubuntu 21.04 x86-64 (or your distribution of choice). I want this node to be x86-64 so that I can be more flexible in the future.
- 2 CPU
- 4 GB RAM
- 25 GB Disk
Raspberry Pi 4 K3S Cluster
- 3 x Raspberry Pi 4 Model B 8GB (you need at least 1 node).
- 3 x Raspberry Pi 4 Model B PoE+ HAT (optional).
- 64 GB USB Stick (I am using USB sticks instead of SD cards).
- A nice case that you can stack your PIs on (optional).
In this guide, I will assume that you already have the OSs ready, so I will skip the OS installation details. But if you need to prepare your OS first, then check this great guide from Ubuntu to get started.
DNS
You need a domain name (such as home.lab). This could be internal or external (real).
- edith.home.lab 10.0.0.16 – VIP, for kube-api
- edith01.home.lab 10.0.0.11 – K3S server node
- edith02.home.lab 10.0.0.12 – K3S agent node
- edith03.home.lab 10.0.0.13 – K3S agent node
- *.k3s.home.lab 10.0.0.16 – A wildcard DNS for Ingress, pointing to VIP
- rancher-admin.home.lab 10.0.0.17 – for Rancher cluster management UI (optional)
1) Configuring the Keepalived Cluster
We will first start with configuring the Keepalived between our K3S nodes (PIs) to set the Virtual IP (VIP).
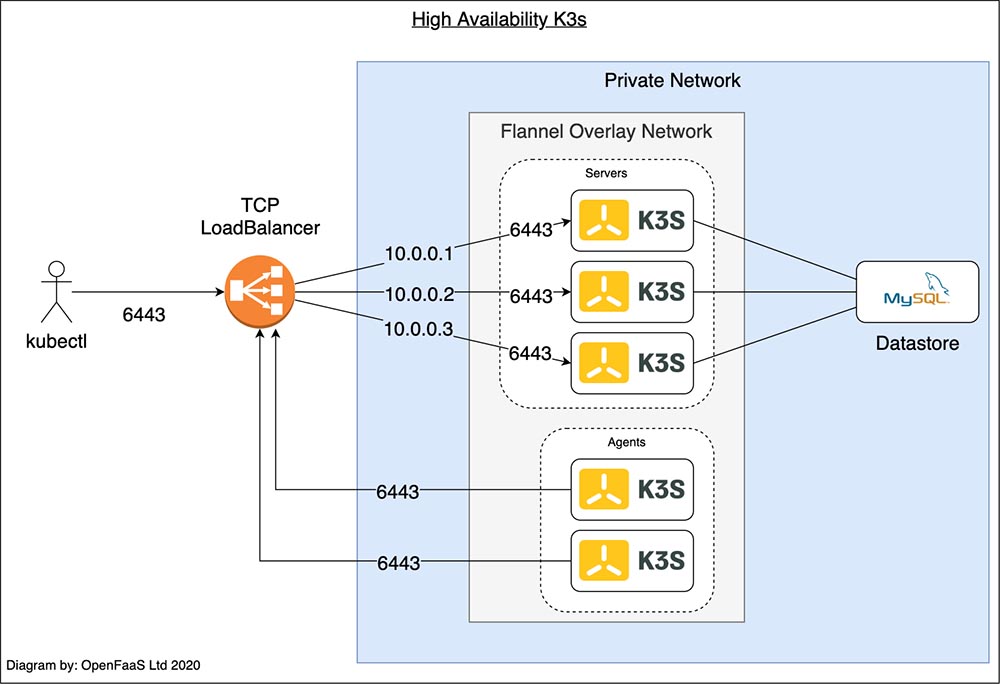
“Why do we need this?”, you might ask. Kubernetes API server exposes port 6443 to communicate with external clients, such as kubectl or our Rancher management node. But if you have multiple K3S server nodes, then you need a LoadBalancer on top to distribute the incoming traffic across the nodes and have protection for outages on one of your server (master) nodes.

In addition to that, you also need LoadBalancer to balance your ingress traffic between your agent (worker) nodes to access your services. Therefore, we need an external LoadBalancer on top of our cluster, or, we can use Keepalived to share the VIP address between the RPI nodes.
In order to install Keepalived, you need to run;
sudo apt-get install keepalivedon each of your K3S nodes (edith01, edith02, and edith03 for my case). After the installation, we need to configure keepalived to dedicate an IP as VIP and set the priority between our nodes before starting the service. I will use 10.0.0.16 it as the VIP.
vi /etc/keepalived/keepalived.conf
You can see the example configs for primary and secondary nodes below;
! Configuration File for keepalived primary node

global_defs {
   notification_email {
     sysadmin@home.lab
   }
   notification_email_from edith01@home.lab
   smtp_server localhost
   smtp_connect_timeout 30
}

vrrp_instance VI_1 {
    state MASTER
    interface eth0
    virtual_router_id 101
    priority 102
    advert_int 1
    authentication {
        auth_type PASS
        auth_pass 1111
    }
    virtual_ipaddress {
        10.0.0.15
    }
}
! Configuration File for keepalived secondary

global_defs {
   notification_email {
     sysadmin@home.lab
   }
   notification_email_from edith02@home.lab
   smtp_server localhost
   smtp_connect_timeout 30
}

vrrp_instance VI_1 {
    state BACKUP
    interface eth0
    virtual_router_id 101
    priority 101
    advert_int 1
    authentication {
        auth_type PASS
        auth_pass 1111
    }
    virtual_ipaddress {
        10.0.0.15
    }
}
After changing the config in each node and setting the priority levels (primary – highest, secondary – lower) and the virtual_ipaddress, you can enable and start the keepalived service with;
sudo systemctl enable --now keepalived
You should see the VIP on your primary node when you run ip addr show eth0
2: eth0: <BROADCAST,MULTICAST,UP,LOWER_UP> mtu 1500 qdisc mq state UP group default qlen 1000
    link/ether dc:a6:32:ed:15:47 brd ff:ff:ff:ff:ff:ff
    inet 10.0.0.11/24 brd 10.0.30.255 scope global dynamic eth0
       valid_lft 84831sec preferred_lft 84831sec
    inet 10.0.0.15/32 scope global eth0
       valid_lft forever preferred_lft forever
    inet6 fe80::dea6:32ff:feed:1547/64 scope link
       valid_lft forever preferred_lft forever
and you can test the failover scenario by shutting down your primary node, just for fun 🙂
2) Enable Legacy iptables instead of nftables
nftables is the successor to iptables and it replaces the existing iptables, ip6tables, arptables, and ebtables. If you are interested in the details, check out this amazing article from Gentoo Wiki. The newer versions of the most common Linux distributions, such as RHEL 8, CentOS 8, Debian Buster, Ubuntu 20.04, etc, already switched to nftables but K3S does not support this yet .
Ubuntu 21.04 comes with nftables, by default. You can check your current backend with;
root@edith02:~# iptables --version
iptables v1.8.7 (nf_tables)
In order to switch back to legacy iptables backend, run;
sudo update-alternatives --set iptables /usr/sbin/iptables-legacy
sudo update-alternatives --set ip6tables /usr/sbin/ip6tables-legacy
then check your backend again,
root@edith02:~# iptables --version
iptables v1.8.7 (legacy)
and reboot. You need to do the same steps for all your nodes (obviously).
3) Enable cgroups
K3S needs cgroups to start the systemd service. cgroups can be enabled by appending cgroup_memory=1 cgroup_enable=memory to /boot/cmdline.txt.
root@edith03:~# cat /boot/cmdline.txt
cgroup_memory=1 cgroup_enable=memory
Deploying the K3S Cluster
Deploying the K3S-server and K3S-agent nodes is pretty straightforward, especially if you want to stick with the default settings. But as I said in the previous chapter, I wanted to deploy my cluster with Calico instead of Flannel (K3S default) as CNI, Nginx Ingress instead of Traefik (K3S default) Ingress and etcd instead of SQLite, therefore, we will add some additional steps and flags to the default command.
4.1) Bootstrapping the Server Node
In order to use etcd in the HA mode, you must have an odd number of server node(s) and should deploy the cluster with --cluster-init flag. Although that I only do have one server node to start with, etcd should adjust itself and automatically upgrade into a cluster configuration when I add additional nodes in the future. In addition to that, I will also disable Traefik, Flannel and servicelb in order to use nginx-ingress, Calico and Metallb instead. I will also set --cluster-cidr=192.168.0.0/16 and change the default value in order to deploy Calico without messing with the default Calico yaml files.
If you also want to check out other options as well, such as cluster-domain etc., you can see all of the configuration options from here .
Before we deploy our server node with the desired config, we should create a server token. We will use this token in the future while we want to register our agents (and any other future nodes) into the cluster. I am using an online base64 encoder to generate random string as a token , something like this;
root@edith01:~# cat k3s-server-token
aHR0cHM6Ly9ob21lYXV0b21hdGlvbi53aWtpLw==
And finally, deploy your server node with;
curl -sfL https://get.K3S.io | K3S_TOKEN_FILE=/root/k3s-server-token \
INSTALL_K3S_EXEC="server --disable traefik --disable=servicelb --disable=traefik --flannel-backend=none --disable-network-policy --cluster-cidr=192.168.0.0/16" \
sh -s - --cluster-init --kube-apiserver-arg=feature-gates=RemoveSelfLink=false
this might take ~2 minutes to complete.
root@edith01:~# curl -sfL https://get.k3s.io | K3S_TOKEN_FILE=/root/k3s-server-token \
INSTALL_K3S_EXEC="server --disable traefik --disable=servicelb --disable=traefik --flannel-backend=none --disable-network-policy --cluster-cidr=192.168.0.0/16" \
sh -s - --cluster-init --kube-apiserver-arg=feature-gates=RemoveSelfLink=false
[INFO]  Finding release for channel stable
[INFO]  Using v1.21.2+k3s1 as release
[INFO]  Downloading hash https://github.com/k3s-io/k3s/releases/download/v1.21.2+k3s1/sha256sum-arm64.txt
[INFO]  Downloading binary https://github.com/k3s-io/k3s/releases/download/v1.21.2+k3s1/k3s-arm64
[INFO]  Verifying binary download
[INFO]  Installing k3s to /usr/local/bin/k3s
[INFO]  Creating /usr/local/bin/kubectl symlink to k3s
[INFO]  Creating /usr/local/bin/crictl symlink to k3s
[INFO]  Creating /usr/local/bin/ctr symlink to k3s
[INFO]  Creating killall script /usr/local/bin/k3s-killall.sh
[INFO]  Creating uninstall script /usr/local/bin/k3s-uninstall.sh
[INFO]  env: Creating environment file /etc/systemd/system/k3s.service.env
[INFO]  systemd: Creating service file /etc/systemd/system/k3s.service
[INFO]  systemd: Enabling k3s unit
Created symlink /etc/systemd/system/multi-user.target.wants/k3s.service → /etc/systemd/system/k3s.service.
[INFO]  systemd: Starting k3s
and you can check the status of k3s-server with;
root@edith01:~# systemctl status k3s.service
● k3s.service - Lightweight Kubernetes
     Loaded: loaded (/etc/systemd/system/k3s.service; enabled; vendor preset: enabled)
     Active: active (running) since Sat 2021-07-17 22:37:26 UTC; 5min ago
       Docs: https://k3s.io
    Process: 9982 ExecStartPre=/bin/sh -xc ! /usr/bin/systemctl is-enabled --quiet nm-cloud-setup.service (code=exited, status=0/SUCCESS)
    Process: 9984 ExecStartPre=/sbin/modprobe br_netfilter (code=exited, status=0/SUCCESS)
    Process: 9985 ExecStartPre=/sbin/modprobe overlay (code=exited, status=0/SUCCESS)
   Main PID: 9986 (k3s-server)
      Tasks: 32
     Memory: 665.9M
     CGroup: /system.slice/k3s.service
             ├─ 9986 /usr/local/bin/k3s server
             └─10002 containerd
and of course, you can check your K3S cluster (it will become a cluster in a few steps anyway) with kubectl;
root@edith01:~# kubectl get nodes
NAME      STATUS   ROLES                       AGE   VERSION
edith01   Ready    control-plane,etcd,master   18m   v1.21.2+k3s1
If you want to delete & re-deploy, you can easily do that with running k3s-uninstall.sh
root@edith01:~# k3s-uninstall.sh
+ id -u
+ [ 0 -eq 0 ]
+ /usr/local/bin/k3s-killall.sh
+ [ -s /etc/systemd/system/k3s.service ]
+ basename /etc/systemd/system/k3s.service
+ systemctl stop k3s.service
+ [ -x /etc/init.d/k3s* ]
+ killtree 3106 3213 3249 3284 3286
+ kill -9 3106 3159 3213 3239 3249 3314 3284 3345 3286 3338
+ do_unmount_and_remove /run/k3s
+ xargs -r -t -n 1 sh -c umount "$0" && rm -rf "$0"
+ sort -r
+ awk -v path=/run/k3s $2 ~ ("^" path) { print $2 } /proc/self/mounts
.
.
.
+ type yum
+ remove_uninstall
+ rm -f /usr/local/bin/k3s-uninstall.sh
4.2) Deploying Calico as CNI
Before adding new nodes to our cluster, we should first install our CNI of choice, Calico, although that you can also install something different , to the cluster in order to have the software-defined networking ready and available.
Calico is best known for its performance and network policy enforcement capabilities. I also experienced some weird DNS resolving issues with the Flannel overlay network and found out an open Github issue linked with it, and the only working solution was to use --flannel-backend=host-gw instead of the default VXLAN backend, which I do not like. If you are interested in different CNIs, feel free to check this great article from Rancher Blog.
In order to get started with Calico, you just need to run;
kubectl apply -f https://docs.projectcalico.org/manifests/calico.yaml
this will create a couple of CRDs along with other things and a Daemonset which will run on each node. You can check your deployment status with;
root@edith01:~# kubectl get ds -n kube-system
NAME          DESIRED   CURRENT   READY   UP-TO-DATE   AVAILABLE   NODE SELECTOR            AGE
calico-node   1         1         1       1            1           kubernetes.io/os=linux   86m
If your Calico daemonset is in READY status, then you are also ready to proceed.
4.3) Bootstrapping Additional Server Node(s)
Although that I will not add additional server nodes to my cluster right now, you can easily achieve this by copying your node token from /var/lib/rancher/k3s/server/node-token on your first node;
root@edith01:~# cat /var/lib/rancher/k3s/server/node-token
K108bd4b6fc55e1ce77bbc321d49d::server:aHR0cHM6Ly9ob21lYXV0b21hdGlvbi53aWtpLw==
then run this command on the node that you wanted it to add to the cluster;
root@edith02:~# curl -sfL https://get.k3s.io | INSTALL_K3S_EXEC=" server --server https://<vip or domain name>:6443 --token <your-node-token>" sh -s -
Dont forget to set <vip or domain name> and <your-node-token> fields it the above command. This might take ~2 minutes to complete.
You can check the status of your cluster with running;
root@edith01:~# kubectl get nodes
NAME      STATUS     ROLES                       AGE   VERSION
edith01   Ready      control-plane,etcd,master   22m   v1.21.2+k3s1
edith02   Ready      control-plane,etcd,master   12s   v1.21.2+k3s1
on your first node. Repeat this step for each node that you want to add to the cluster. Agent nodes will have control-plane,etcd,master as their cluster role.
4.4) Bootstrapping Agent Node(s)
Deploying agent nodes are almost the same as the additional server nodes, except with a slight difference in the last command. Again, start with copying your node token from /var/lib/rancher/k3s/server/node-token on your first node;
root@edith01:~# scp  /var/lib/rancher/k3s/server/node-token
K108bd4b6fc55e1ce77bbc321d49d::server:aHR0cHM6Ly9ob21lYXV0b21hdGlvbi53aWtpLw==
then run this command on the node that you wanted it to add to the cluster;
root@edith02:~# curl -sfL https://get.k3s.io | INSTALL_K3S_EXEC=" agent --server https://<vip or domain name>:6443 --token <your-node-token>" sh -s -
Dont forget to set <vip or domain name> and <your-node-token> fields it the above command. This might take ~2 minutes to complete.
You can check the status of your cluster with running;
root@edith01:~# kubectl get nodes
NAME      STATUS     ROLES                       AGE   VERSION
edith01   Ready      control-plane,etcd,master   22m   v1.21.2+k3s1
edith02   Ready      <none>                      12s   v1.21.2+k3s1
on your first node. You might also want to check your pods as well;
root@edith01:~# kubectl get pods -A
NAMESPACE       NAME                                       READY   STATUS    RESTARTS   AGE
cattle-system   cattle-cluster-agent-77896486cd-f5pj4      1/1     Running   0          44m
fleet-system    fleet-agent-d59db746-lvjmb                 1/1     Running   1          65m
kube-system     calico-kube-controllers-78d6f96c7b-5bv72   1/1     Running   7          44m
kube-system     calico-node-k5m75                          1/1     Running   1          88m
kube-system     calico-node-mrsx5                          1/1     Running   0          86m
kube-system     calico-node-n2m9c                          1/1     Running   1          86m
kube-system     coredns-7448499f4d-m67mf                   1/1     Running   0          44m
kube-system     local-path-provisioner-5ff76fc89d-flhxj    1/1     Running   0          31m
kube-system     metrics-server-86cbb8457f-hz9s7            1/1     Running   0          44m
Repeat this step for each node that you want to add to the cluster. Agent nodes will have <none> as their cluster role, this is normal.
5) Deploying Nginx-ingress instead of Traefik
Our cluster is ready to roll, except for an ingress controller to expose our services to the outside network. If you remember, we initiated --disable traefik flag to disable the default traefik ingress controller, during the initial deployment of the cluster. But if you did not, you can still disable traefik with changing the /etc/systemd/system/k3s.service/k3s.service file and add --disable=traefik flag.
ExecStart=/usr/local/bin/k3s \
    server \
        '--disable=servicelb' \
        '--disable=traefik' \
        '--flannel-backend=none' \
        '--cluster-init' \
        '--kube-apiserver-arg=feature-gates=RemoveSelfLink=false' \
then you can reload the configuration file with systemctl daemon-reload command and restart the service with systemctl restart k3s.service. This should automatically remove traefik from your cluster.
Installing Nginx-ingress with Helm Charts
We will use the official nginx-ingress Helm Chart to install Nginx Ingress Controller and I learned from our friends from SUSE that K3S has this nice feature that allows us to deploy Helm Charts by placing a yaml file under /var/lib/rancher/k3s/server/manifests.
I used this knowlage base article from SUSE but while doing so, I realized that in their yaml file, the chart name and version are not written correctly. Therefore, we will change the commend slightly;
cat >/var/lib/rancher/k3s/server/manifests/ingress-nginx.yaml <<EOF
apiVersion: v1
kind: Namespace
metadata:
  name: ingress-nginx
---
apiVersion: helm.cattle.io/v1
kind: HelmChart
metadata:
  name: ingress-nginx
  namespace: kube-system
spec:
  chart: ingress-nginx
  repo: https://kubernetes.github.io/ingress-nginx
  targetNamespace: ingress-nginx
  set:
  valuesContent: |-
    fullnameOverride: ingress-nginx
    controller:
      kind: DaemonSet
      hostNetwork: true
      service:
        enabled: false
      publishService:
        enabled: false
      metrics:
        enabled: true
      config:
        use-forwarded-headers: "true"
EOF
This will automatically trigger K3S to deploy ingress-nginx Helm Chart in DaemonSet mode with hostNetwork enabled. You should see helm-install-ingress-nginx-xxx deployment being created under your kube-system namespace.
root@edith01:~# kubectl get pods -n kube-system
NAME                                       READY   STATUS              RESTARTS   AGE
calico-kube-controllers-78d6f96c7b-5bv72   1/1     Running             7          45m
calico-node-k5m75                          1/1     Running             1          89m
calico-node-mrsx5                          1/1     Running             0          87m
calico-node-n2m9c                          1/1     Running             1          87m
coredns-7448499f4d-m67mf                   1/1     Running             0          45m
helm-install-ingress-nginx-j95pf           0/1     ContainerCreating   0          10s
local-path-provisioner-5ff76fc89d-flhxj    1/1     Running             0          33m
metrics-server-86cbb8457f-hz9s7            1/1     Running             0          45m
Enabling hostNetwork will ensure that our pods running in the cluster will use the network of the host they run and the NGINX Ingress controller will bind ports 80 and 443 directly. If you want to learn more about this or check any other alternatives, please check here .
You can check your deployment status with;
root@edith01:~# kubectl get pods -n ingress-nginx
NAME                             READY   STATUS    RESTARTS   AGE
ingress-nginx-controller-885js   1/1     Running   0          4m13s
ingress-nginx-controller-vl6z8   1/1     Running   0          4m13s
ingress-nginx-controller-wg47f   1/1     Running   0          4m13s
and that’s it. Now you have a K3S cluster ready with 3 nodes and with Calico instead of only Flannel (default) as CNI, Nginx Ingress instead of Traefik (K3S default) Ingress and etcd instead of SQLite.
To the Future and Beyond
From now on, we are ready to deploy and run stuff in our K3S cluster in Raspberry PIs and we finalized all of the steps, except the optional ones in my wishlist in the Design chapter.
The optional points will make your cluster more expandable, especially with the CSI interfaces such as Longhorn, and will automate some painful stuff such as Let’s Encrypt SSL certificate renewals and cluster management with Rancher GUI but they are not mandatory for your cluster to function, therefore I will be covering those topics under separate post.
See you next time!


